For the life of me, eye can't remember the name of the magazine eye saw these in while getting my hair done last week, but they were too cute to pass up for Halloween treats!
And with how busy my life has been lately, eye am not sure how eye find time to do fun things like this, but it sure is rewarding! Eye can't wait to take these in to work tomorrow!
1 package funfetti cake mix
1 tub vanilla frosting
2 tubes red decorating gel
chewy spree
black M&Ms
Make the cake according to the cupcake directions (makes 24). Frost. Place a chewy Spree in the middle and top with a black M&M using some frosting for glue. Draw squiggly lines using the red decorating gel and use a toothpick to spread the gel out over the cupcakes.
Monday, October 19, 2009
Sunday, October 18, 2009
Green Goddess Dressing
Another fabulous find from Gina’s Weight Watchers Recipes! With basil coming out of my ears and hesitancy to make high fat pesto, I was eager to make this salad dressing. I apologize for not having a good picture of it. It turned out fantastic and was gone before I could get a good picture of it.
1/2 cup light mayonnaise, such as Hellman's
1/2 cup scallions, chopped
1/2 cup chopped fresh basil, packed
1/8 cup fresh squeezed lemon juice (1 lemon)
1 clove garlic, chopped
1 tsp kosher salt
1/2 tsp freshly ground black pepper
1 tsp anchovy paste – I skipped this
1/2 cup light sour cream
Place all ingredients except for sour cream in a blender and blend until smooth. Add sour cream and process until blended. Keep refrigerated until serving.
Fresh Raspberry Vinaigrette
Earlier this summer, when the berries were plentiful, I attempted Ellie's Fresh Blackberry Vinaigrette over at Vintage Victuals. Her recipes are very savory; you should definitely check her out. With raspberries on hand, I used them instead of the blackberries. I also used my favorite Pomegranate Balsamic Vinegar.
4 ounces of fresh raspberries, washed
2 teaspoons lemon juice
1/4 cup balsamic vinegar
1 clove garlic, minced
Apx. 2 tablespoons red onion, minced
1/2 cup extra virgin olive oil
Salt and pepper to taste
In a blender or small food processor, puree the raspberries with the lemon juice. Pour the mixture through a sieve or fine strainer to remove the seeds. Pour the resulting raspberry juice back into the processor.
Add the vinegar, the garlic, and the red onion. Pulse to blend. Next, stream in the extra virgin olive oil with the processor on medium speed. Season with salt and pepper to taste. Serve with fresh salad greens.
Thursday, October 15, 2009
Pumpkin Pie Half Moons
Awww! Aren’t they cute!! We had Matt’s sister, her husband and our adorable nephew over for dinner last week. We served blue cheese and spinach stuffed pork tenderloin with creamy truffle and brie grits. For dessert, I really wanted to do something fall-ish. So I bought some canned pure pumpkin and decided I would figure it out from there. When I saw this recipe for Pumpkin Half Moon Pockets, I knew that would be the winner, as I had a puff pastry calling my name in the freezer. These were sooooo good! Served with some butter pecan ice cream, they were the perfect complement to dinner.
I halved this recipe, which made about 10 pockets. My changes are as follows:
1 sheet frozen puff pastry, 9 1/2 inches square
1 large egg, lightly beaten
1 tablespoon granulated sugar
1/4 tsp cinnamon
For the pumpkin filling:
1/2 cup pure canned pumpkin (not seasoned pumpkin pie filling)
1 1/2 tablespoons firmly packed light brown sugar
1 tablespoon all-purpose flour
1/2 tsp ground cinnamon
1/4 tsp ground ginger
1/4 tsp ground nutmeg
Remove the puff pastry from the box, setting on a lightly floured surface, and covering it with plastic wrap. Do not unfold at this point. Let the covered puff pastry sit on the counter top until thawed and just pliable, about 20 minutes.
Meanwhile, position the oven rack on the middle rung. Heat to 425 degrees. Line a cookie sheet with parchment paper or a non-stick liner. Have the beaten egg ready, along with 1 tablespoon granulated sugar.
On a lightly floured work surface, carefully unfold the puff pastry. Dust the top of the pastry with a little flour. Roll out the sheet, lightly dusting with flour as needed to prevent the dough from sticking to the rolling pin and work surface, into a 12 inch square. Using a 4 inch round cookie cutter (or the bottom of a 29-oz tomato can as a guide), cut out 9-10 circles by firmly pressing the cookie cutter or can into the dough, then twisting slightly. Peel away the scraps of extra dough and cover the rounds with plastic wrap while preparing the filling.
For the pumpkin filling, combine the ingredients in a medium bowl and stir until well blended.
Place about 1 tablespoon of filling on the center of a round. Brush the edge of the dough with the egg. Fold half the dough over the filling to form a half-moon.
Using the tines of a fork, press the curved edges to seal tightly. Repeat with the remaining rounds. At this point the pockets can be covered with plastic wrap and refrigerated for up to 8 hours or frozen for up to 1 month before proceeding.
Arrange the pockets on the prepared sheet pan, spacing them about 2 inches apart. Brush the tops with the remaining egg and sprinkle evenly (and generously) with the granulated sugar.
Bake until pasty is puffed and browned, 15-20 minutes, checking on them frequently after 10 minutes has passed (in case your oven cooks them faster.) Transfer the sheet pats to racks to cool. Serve warm… with ice cream.
Storage: You can bake the pockets up to 6 hours ahead and reheat them in a 300 degree oven until warm, about 10-15 minutes.
I halved this recipe, which made about 10 pockets. My changes are as follows:
1 sheet frozen puff pastry, 9 1/2 inches square
1 large egg, lightly beaten
1 tablespoon granulated sugar
1/4 tsp cinnamon
For the pumpkin filling:
1/2 cup pure canned pumpkin (not seasoned pumpkin pie filling)
1 1/2 tablespoons firmly packed light brown sugar
1 tablespoon all-purpose flour
1/2 tsp ground cinnamon
1/4 tsp ground ginger
1/4 tsp ground nutmeg
Remove the puff pastry from the box, setting on a lightly floured surface, and covering it with plastic wrap. Do not unfold at this point. Let the covered puff pastry sit on the counter top until thawed and just pliable, about 20 minutes.
Meanwhile, position the oven rack on the middle rung. Heat to 425 degrees. Line a cookie sheet with parchment paper or a non-stick liner. Have the beaten egg ready, along with 1 tablespoon granulated sugar.
On a lightly floured work surface, carefully unfold the puff pastry. Dust the top of the pastry with a little flour. Roll out the sheet, lightly dusting with flour as needed to prevent the dough from sticking to the rolling pin and work surface, into a 12 inch square. Using a 4 inch round cookie cutter (or the bottom of a 29-oz tomato can as a guide), cut out 9-10 circles by firmly pressing the cookie cutter or can into the dough, then twisting slightly. Peel away the scraps of extra dough and cover the rounds with plastic wrap while preparing the filling.
For the pumpkin filling, combine the ingredients in a medium bowl and stir until well blended.
Place about 1 tablespoon of filling on the center of a round. Brush the edge of the dough with the egg. Fold half the dough over the filling to form a half-moon.
Using the tines of a fork, press the curved edges to seal tightly. Repeat with the remaining rounds. At this point the pockets can be covered with plastic wrap and refrigerated for up to 8 hours or frozen for up to 1 month before proceeding.
Arrange the pockets on the prepared sheet pan, spacing them about 2 inches apart. Brush the tops with the remaining egg and sprinkle evenly (and generously) with the granulated sugar.
Bake until pasty is puffed and browned, 15-20 minutes, checking on them frequently after 10 minutes has passed (in case your oven cooks them faster.) Transfer the sheet pats to racks to cool. Serve warm… with ice cream.
Storage: You can bake the pockets up to 6 hours ahead and reheat them in a 300 degree oven until warm, about 10-15 minutes.
Monday, October 12, 2009
Applecrisp for Two!
One of my hotel reps stopped by the other day to drop off some goodies and it included honeycrisp apples, MY FAVORITE! I knew I had to make up some apple crisp. But with just Mr. Tote and I, I didn’t want to make up a large dish full of it. Enter mini ramekins! This was incredibly easy. I sorta guessed from memory on the recipe, recalling how my mom used to make it and it turned out fantastic! I would have loved some vanilla ice cream to go with it, but it stood just fine on its own.
Filling
1 large honeycrisp apple
1 tsp lemon juice
2 tsp sugar
1 tsp cinnamon
¼ tsp fresh ground nutmeg
Butter for rubbing in the ramekins
Topping
3 Tbsp cold butter, roughly chopped
¼ C flour
½ C white sugar
1 tsp cinnamon
Preheat oven to 375 degrees.
Peel the apple with a paring knife and slice thinly. This produces about a cup and a half of apple pieces.
Combine the apple pieces with the lemon juice, sugar, cinnamon and nutmeg in a bowl.
In a separate bowl, combine the butter, sugar flour and cinnamon. Mash together with a fork until it forms little balls of goodness.
Lightly butter the ramekins. Add the apple mixture and top with the flour mixture. Place the ramekins on a baking sheet, in case of any spillage.
Bake for 30-35 minutes, or until lightly browned on top.
Serve as is, or with some ice cream. Try not to stab family and friends as you lunge for their crumbly topping.
Saturday, October 10, 2009
Foster Kittens
We picked up new foster kittens this week. They are adorable, so I figured I'd share them with you. The most fun part is getting to name them. Oh, and give them baths. That's fun because they look so cute when they're wet.
They'll go back to the humane society in two weeks, since WE ARE LEAVING FOR MEXICO ON THE 25TH!!
Turkey and Corn Chowder
With the weather cooling down and the wind gusting, I have been dying to make some soup. I pulled out some leftover turkey breast and corn "off" the cob that I had from corn season out of the freezer. I used Paula Deen's Chef Jack's Corn Chowder recipe as a guide, but I modified it majorly. Hello!?!?!? Two sticks of butter!??!?! Ridiculous...
1 Tbsp Brummel and Brown yogurt spread
1 small onion, diced
15-20 baby carrots, diced
1 clove garlic, minced
2 cups white corn kernels, fresh or frozen
1 C cooked, diced turkey breast
3 cups chicken stock
1 C fat free half and half
1 C 1/2% Milk
3 Tbsp cornstarch
1/2 C COLD water
Pinch freshly grated nutmeg
Kosher salt and freshly ground black pepper
Melt the butter in the soup pot over medium heat. Add the onion, carrot, and garlic, and saute for 2 minutes.
Add the corn and chicken stock and bring to a boil. Simmer for 10 minutes.
Add the half-and-half and milk and bring to a simmer. Mix the cornstarch with COLD water. Slowly add the mixture until the soup thickens (you may not need all of it to thicken the soup).
Add the nutmeg and salt and pepper, to taste, right before serving.
This soup really hit the spot. It was thick and full of flavor. We'll definitely be making this again!
WW Points per serving (1/6th of the recipe): 3 points
Thursday, October 8, 2009
A Peck of Pickled Peppers
OK, so more like 4 small jars, but I am acting as excited as if it were a full peck. This was our first experience canning and it actually worked *gasp!!* We planted four little banana pepper plants back in spring and they produced lots of beautiful peppers. The recipe below made about 4 pints of peppers.
1 Garlic Clove
1 1/2 lb to 2 lbs banana peppers
1 Tbsp salt
2 C water
1 C white vinegar
Celery seed
Fennel seed
Prepare jars and lids by washing them in HOT soapy water. Leave them in clean hot water until you're ready to use them.
Wash the peppers, remove the tops, deseed and cut into thin rings. I would recommend using gloves. Even though banana peppers aren't known for being hot, I still managed to feel stinging on my upper lip for about an hour. I must have scratched my nose or something. But what a pain it was, literally.
In a large pot, combine the vinegar, salt and water. Heat on high until boiling.
Remove one jar at a time to begin the canning process.
Add a clove of garlic, then pack banana peppers tightly into jar. Add a tiny dash of celery seed and fennel. Then pour the hot vinegar-water mixture over the peppers. Immediately put on the lid and ring tightly to seal.
In a canning pot of boiling water, process the jars in a water bath for 10 minutes.
I really can't say how these taste, as we haven't opened a jar yet. They've been "marinating" for a few weeks now. I think it's about time to break open a jar. Don't you?
Monday, October 5, 2009
Fiesta Chicken
This past week at Weight Watchers, they broke out the super easy crock pot recipes. Can of salsa + meat = dinner. So I figured I’d give it a try. Oh.my.gosh. This meal was sooooo good!! Mr. Tote took one bite and told me to add it to our repertoire of “go to” meals. Fine by me! This one was a cinch to make!
2 boneless, skinless chicken breasts
1 jar (15 oz) mild, thick and chunky salsa
1 can frijoles negros (that’s black beans for all my gringo amigos), drained
1 C frozen corn
Layer the chicken breasts, then salsa, beans and corn. Cook on high for 2-3 hours or low 4-5 hours. Remove the chicken and shred. Then return it to the crock pot and cook on low for an additional half an hour. I served it with just a little bit of brown rice, a little bit of 2% Mexican cheese and a dollop of light sour cream.
The leftovers for lunch today were just as good as last night’s dinner. I’m looking forward to MORE leftovers tomorrow!
WW Points per Serving: 5 points (3/4 C of the chicken mixture and 1/4 C rice) The cheese and sour cream are extra, kiddies!
Sunday, October 4, 2009
Turkey Stuffed Zucchini
This is a great recipe I found over at Gina’s Weight Watchers Recipes. Without ground turkey on hand, I used 95% lean ground beef. I also added some marinara sauce on top, which was a great addition, for only one extra point.
2 medium zucchini
1/2 tsp butter
1/4 onion, finely diced
1/2 shallot, minced
1 garlic clove, crushed
2 tbsp white wine
8 oz (1/2 lb) ground turkey, or 95% lean ground beef
1 large egg white
1/4 cup grated parmesan cheese
1/4 cup fat free chicken broth
2 tbsp seasoned breadcrumbs
1 tsp paprika
1 tsp fresh chopped rosemary
1 tsp garlic powder
1 tsp marjoram
1 tsp dried basil
Salt and fresh pepper
Preheat oven to 400°. Cut zucchini in half lengthwise and using a spoon or melon baller, scoop out flesh, leaving 1/4" thick. Arrange in a baking dish. Chop the scooped out flesh of the zucchini in small pieces.
In a large saute pan, melt butter and add onion, shallot and garlic. Cook for 2-3 minutes, until onions are translucent. Add chopped zucchini and season with a pinch of salt, cook about 2-3 minutes. Add wine and cook until it reduces. Add ground turkey and season with salt and pepper, cooking until turkey is white, breaking up in smaller pieces. Add paprika, garlic powder, marjoram and basil. Mix well and cook another minute.
Place turkey meat in a large mixing bowl and set aside to cool. When cooled, add parmesan cheese and egg white, mix well. Using a spoon, fill hollowed zucchinis with stuffing, pressing firmly and top with bread crumbs. Place chicken broth in bottom of the baking dish and cover tightly with foil. Bake 35 minutes.
WW Points per Serving (serves 2): 4 points; 5 points with 1/4 C warmed marinara per person
Friday, October 2, 2009
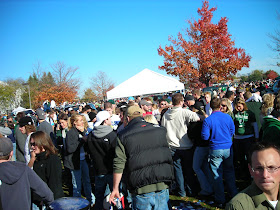
Showdown in East Lansing
My friends, the time has come. Tomorrow marks the 102nd meeting of the Michigan State Spartans and the University of Michigan Wolverines. To say that this game is monumental wouldn't do it justice. Michigan leads the all-time series 67-29-5. I could go on and on about the arrogance of U of M fans, but I won't stoop to their level. So what if 80% of their fans never went to school there. Aaahhh... I digress.
So I leave you with some of my favorite pictures from my time at and after Michigan State. Yes, I actually WENT to the school I cheer for. Class of 2004. GO GREEN. GO WHITE.
The band. Don't be embarrassed if you tear up watching them. Happens to me every time...
Justin Abdelkader of the Detroit Red Wings (and Spartan alum) brought the Stanley Cup to campus in 2008.
Giant Jenga at 447 Spartan Street, where our friends live.
Thursday, October 1, 2009
DIY Dresser Makeover
Ever since I discovered the DIY Show Off a few months ago, my creative juices have been flowing. So, when I saw this old, beat up dresser on Craigslist, I figured it would be the perfect piece to test out my new interest.
I paid $40 for this puppy. It sat in the garage for a few weeks, while I stewed about color.
We removed the hardware and gave it a good sanding before painting it. Despite my suggestion to use spray paint, like most of the DIYers, Mr. Tote insisted on using regular, semi-gloss paint. Fine. He likes to paint, so he ended up painting most of it. We purchased a gallon of the white so we can use it on other projects. With Mr. Tote's connections, the gallon cost $22 (normally $40). The white is some kind of "Seashell White" from O'Leary's/Caulkins (Forgive me. I have a head cold and can't remember for the life of me what the name of the color is) and the top is Valspar's Fired Earth. The white has just a bit of gray in it and the dark color is a very, very dark brown/gray, but not black. We bought a paint sample size of the Valspar for $4. The hardware is from Menard's. I got a great deal on these, at only 99 cents each! They are brushed nickel with black streaks.
Total cost for this project was $74, but we have enough white paint to paint every piece of furniture I set my sights on for the next year.
I'm sending this off to Roeshel at the DIY Show Off and will be participating in her surprise party. FUN!