Monday, November 30, 2009

Ribbon Wreath

I saw this cutesy wreath over at the fabulous Roeshel's DIY Show Off blog. Super adorable. Super inexpensive. Super fast. Click here for her detailed, step-by-step tutorial. I used a $1 foam wreath I got at the Dollar Store (hollah!!!) and some ribbon I picked up at Michaels for 70% off on Black Friday (score!!). Here are some pics I took along this short crafting journey.


And the finished product, 30 yards of wired ribbon later!


I am SO linking to Roeshel's DIY Show Off Holiday Highlights party, after all, this is her project! I swear, I'm not a crazy blog stalker or anything. But if you can take a moment, Roeshel is a finalist in the running to win a $5000 True Value shopping spree to re-do her bathroom! Click HERE to vote for her. And be sure to watch her video. It's great!

I'm also linking to:


Someday Craft's Wreath Inspiration

Sunday, November 29, 2009

Spinach Artichoke Dip

I find that certain restaurants really nail spinach artichoke dip. Others fail miserably. And that's what I really hate. When you go to a restaurant, craving some of the cheesy, tangy, creamy goodness, and then you're seriously dissapointed when "said restaurant" totally misses the mark. That being said, one of my favorite places to get this amazing app is Claddagh's Irish Pub and one of my least favorite places has to be Applebees.

HOWEVER, I think that the recipe below is a serious contender for the top of my list! I'll deem this "Carla's Spinach Artichoke Dip," named after the coordinator at our wedding reception venue. I cannot remember how we got talking about food, but she told me I had to try this recipe. I have since made this for many social gatherings with friends and family. And every time I take my first bite, my eyes slightly roll back in my head, my knees get weak, I mumble some choice words and am taken to a very happy place. If you're looking for a winner, THIS IS IT.

Carla's Spinach Artichoke Dip
1/4 C butter
2 cloves garlic
1/3 C chopped onion - original recipe calls for 3 Tbsp
10 oz package of frozen spinach
1 can artichoke hearts
1/2 C half and half - I used 1 cup of fat free
8 oz cream cheese - I used the 1/3 less fat variety
1/2 C Parmesan cheese
1/2 C shredded sharp cheddar cheese

Thaw the spinach in the microwave and drain thoroughly.

Roughly chop the artichoke hearts on a cutting board.

Melt the butter in a large saucepan.

Crush the garlic cloves and add to the butter, along with the chopped onions. Sautee for 3 minutes, or until lightly golden.

Add the drained spinach and artichoke hearts and continue sauteeing. After 1-2 minutes, add the creamer.

After incorporated, cube the cream cheese and add it to the mixture. Lower the heat and stir until the cream cheese is completely melted and incorporated. Add the parmesan cheese and stir.

Transfer to a pie plate or shallow dish. Sprinkle with the cheddar cheese. Melt in a 350 degree oven or microwave until warm and melted.

Note: I added extra creamer because I found that it tended to dry out when heated. Also, this last time, I served this out of my mini CrockPot, so I omitted the sharp cheddar cheese. The extra liquid really helped in this case, too.

Thursday, November 26, 2009

Happy Thanksgiving!

Happy Thanksgiving to all of you! Sadly, Mr. Tote and I aren't hosting this year. We really would have loved to host, especially with our new house and everything. The picture above is from last year's Thanksgiving, which we hosted in our small apartment. So much has happened since last year! So much to be thankful for. Here's a few things I am thankful for...

This man, my best friend...

Our two crazy "children," Ozzy and Athena. And I am also thankful for the opportunity to rescue such wonderful animals, including Pandora who enriched my/our life for seven years.Our home. I took this picture one morning when the sun was streaming into our family room. It's one of my favorites.

And I am so thanful for our wonderful God. Without Him, none of this would be possible. So, I leave you with the following verse:

"When you have eaten your fill, be sure to praise the Lord your God for the good land he has given you." ~Deuteronomy 8:10

Have a wonderful day, friends. May it be filled with food, family, friends and fellowship.

Wednesday, November 25, 2009

A Tale of Two Squashes: Part 2

Wow! Let me just say how much I looooove spaghetti squash. I've never worked with this stuff until now and it is SO FUN! It's like my mother-in-law's obsession with popping zits. Once you start, you can't stop! String after string of squashy goodness, peeling away from the skin like magic!

Spaghetti Squash Gratin
1 two to three lb spaghetti squash
1 C light sour cream
1/2 C fat free half and half
1 tsp salt
1/2 tsp pepper
2 oz gruyere cheese
4 oz baby swiss cheese
1 tsp dried thyme

Preheat oven to 375 degrees. Piercethe spaghetti squash CAREFULLY in many spots. Place in a baking dish and bake for about an hour, or until soft.

Remove from the oven and let rest until it's cool enough to handle, at least with a hot pad holder. Carefully cut the squash in half and remove the seeds and pulp, with tongs or a spoon. Then separate the strands with a fork and remove from the skin.

In a large bowl, combine the squash, salt, pepper, gruyere, sour cream and creamer.

Place the squash mixture in a baking dish coated with non-stick cooking spray. Top with the baby swiss and a sprinkle of dried thyme.

Bake at 375 for 20 minutes. Place under the broiler for about 5 minutes or until the cheese is bubbly. This dish easily serves six to eight people.

Tuesday, November 24, 2009

A Tale of Two Squashes: Part 1

Ahhhh... fall. One of my favorite times of the year because of all the fresh produce that is available. I decided to experiment this year with different types of winter squash. First, the butternut. I've seen this prepared most commonly as a sweet side dish, combined with brown sugar and butter. I decided to prepare this squash with a savory flavor.

Butternut Squash Casserole
1 two to three lb. butternut squash
2 Tbsp extra virgin olive oil
2 tsp salt
1 tsp pepper
1/3 C fat free half and half
1/2 C blue cheese crumbles
1/2 C parmesan cheese

Pre-heat the oven to 350 degrees.

Prepare the squash for baking by cutting it in half WITH A VERY SHARP KNIFE and scooping out the seeds. Rub both halves with a drizzle of olive oil. Place the halfs cut side up in a baking dish with about an inch of water. Bake uncovered for about an hour, or until fork tender.

In a large bowl, combine the squash (after scooping/scraping it out of the skin) and remaining ingredients, except for the parmesan cheese. Mash with a fork to incorporate everything.

Lightly coat a baking dish with non-stick cooking spray. Transfer the squash mixture to the baking dish and top with the parmesan cheese. Bake at 350 for 20-30 minutes.

P.S. Sorry for the craptastic picture above, but we dove into the squash dish before I remembered to grab the camera. We had this with pork tenderloin, rubbed with dijon mustard and baked with apples and onions.

Saturday, November 21, 2009

Pasta with Brussel Sprouts, Bacon and Mascarpone Cream Sauce

1 C uncooked rotini pasta
6-8 strips bacon
8 brussel sprouts
6 mushrooms
1/2 C Fat free half and half
4 oz Mascarpone cheese – can substitute cream cheese if needed
1/3 C freshly grated parmesan

OK, before you make fun of me for indicating the exact number of brussel sprouts and mushrooms in this recipe, let me say this… I try to make my recipes as “user friendly” as possible. Some readers who are new to cooking may be looking for specific direction about quantities as they become familiar with their kitchen. So that’s why I provided specific numbers of the veggies. Otherwise, this recipe (and countless others) would say “a bit of this” “a smidge of that” “a handful of this” and “a bunch of that.” I tend to use what I have on hand, so tonight, I had half a package of mushrooms and some leftover raw brussel sprouts from a previous dinner. So there’s my two cents on that. Now, on to the recipe!

Start by cleaning and finely chopping the brussel sprouts lengthwise, almost like shredding them. Roughly chop the mushrooms. Set both of these aside.

Bring a large pot of salted water to boil for the pasta and add in when the water is boiling.

Cook the bacon, according to your liking. For this recipe, we used the pre-cooked stuff and just threw it in the microwave for 30 seconds.

Heat a bit of olive oil in a large saucepan and sautee the brussel sprouts and mushrooms while the pasta is cooking. Meanwhile, crumble the bacon.

When the pasta is done cooking, drain the pasta, reserving a half cup of the pasta liquid. Add the pasta and crumbled bacon to the saucepan with the sautéed vegetables.

Add the creamer, mascarpone cheese and parmesan cheese and allow the entire mixture to meld together over low heat. Add salt and pepper to taste.

Top with additional parmesan cheese prior to serving.

Thursday, November 19, 2009

Taco Soup

This is one of my absolute favorite one-pot winter meals. I can't remember where my mom got this recipe, but I love to make it. This is my first batch for this cold season, but I'm sure it won't be the last!

1 lb. ground turkey
1 small onion, chopped
1 package taco seasoning
1 46 oz. container of Spicy and Hot V8
1 16 oz. can of Brook's Chili Hot Beans
12 oz. tomato paste
16 oz. frozen mixed vegetables
tortilla chips
cheese

In a large skillet, cook the ground turkey with the onions.

In a separate very large pot, combine half of the V8 with the tomato paste, using a whisk to incorporate the paste. Once you have a good mix of those two ingredients, dump in the remaining V8, beans, mixed veggies and taco seasoning. Add in the turkey mixture when fully cooked.

Bring to a simmer before serving.

Top with shredded cheese and crushed tortilla chips.

WW Points per Serving: 5 for 1 1/2 C, without cheese and tortilla chips

Monday, November 16, 2009

Burlap Table Runner


FIrst of all, let me say how inspired I am by all of the crafty blogs out there. Some of my favorites are:
The DIY Showoff
The Lettered Cottage
It's So Very Cheri
Room Remix
Craftaholics Anonymous
Someday Crafts
Project Pretty

Materials needed:
burlap
2" wired ribbon, 2.5x the length of your burlap runner
stitch witchery
freezer paper
tempera paint

The inspiration for my burlap table runner comes from la*T*da's give thanks pillow. How cute is that!?!?

Mr. Tote is so supportive of my many projects. How cute is that!?!?

Blow up your letters and trace onto the non-waxed side of the freezer paper. For all the font junkies out there, I used King from dafont.com.

Use an exacto knife to cut out the letters. We found this very easy to do when laying the freezer paper on a piece of scrap carpet. The blade went through MUCH easier than when we had it on the concrete.

Iron your ribbon in half lengthwise. Place the ribbon on both sides of the burlap, sorta like a sandwich.

Using stitch witchery and an iron, "glue" the ribbon in place. You could also use some fabric tacky glue. In fact, it probably would have gone a lot quicker with the glue. Using the stitch witchery and an iron along both sides and front and back took about two hours to complete.

Pin the freezer paper onto the burlap to hold it in place before ironing it down.

Paint in the letters. Be sure to leave a piece of paper on the underside of the burlap! Don't want paint on the kitchen table!
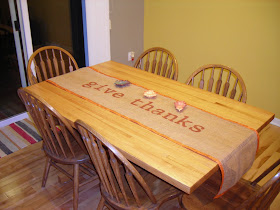
Once the paint is dry, pull off the freezer paper and VOILA!!! I can't believe how well this turned out. I was grinning from ear to ear right after I pulled off the freezer paper.

I am excited to be joining The DIY Showoff's Holiday Highlights Party!

Sunday, November 15, 2009

Chicken Sausage, Kale and White Bean Soup

I admit I was a bit skeptical of making this soup. I have seen many variations of it and couldn't believe that a soup without a creamy base would really satisfy me since we all know how addicted I am to cheese and dairy products. So, I was super excited when I tasted this as it was simmering and was overwhelmed by how fantastic it is! I loosely followed Jenn's recipe, from Cooking in the Heartland.

1 15 oz. can cannellini beans, undrained
48 oz. chicken stock
4 al fresco chicken sausage
1 bell pepper, diced
1 leek, whites and light green, diced
2 cloves garlic
1 Tbsp olive oil
2 small white potatoes, COOKED
small bunch kale
1 tsp cumin
1 tsp paprika

Chop the defrosted, fully cooked chicken sausage lengthwise and then into chunks.

In a large pot, sautee the bell pepper and leeks with the olive oil and garlic. Sautee for 4-5 minutes or until transluscent.

Add the chicken stock and beans to the pot. Bring to a simmer and add the chicken sausage and potatoes. Add the cumin and paprika.

Let simmer for 5-10 minutes. In the meantime, very roughly chop the kale, removing any tough stems.

Add the kale to the pot. Don't worry... it will wilt and meld perfectly with the rest of the soup.

When the kale is fully wilted, pull from the heat and serve. Gosh, this is perfect for a cold evening!!

Friday, November 13, 2009

Blog Friend is a Finalist!

A good blog friend, Mzzzz. Superhero herself, the fabulous Laura Jean (aka LJK-C) is a finalist to have a dress that she designed in the Shabby Apple 2010 Spring Line!


Please take a moment and pop over to the Final 15 voting and give a nod to LJ. Her design is #1 on the list. She certainly deserves to win!

Saturday, November 7, 2009

Pork Scallopini with Butter White Wine Caper Sauce

We'll be adding this one to the "Meals Fit for Guests" list. So yummy!!! I was inspired by this recipe, but since I couldn't actually find the recipe, I just kinda guessed on ingredients and amounts. Good guesses because this dish ROCKED!

1/2 Pork Tenderloin
1 Tbsp capers
1/3 C white wine
3 Tbsp butter
1 Shallot, finely chopped
1/3 C Flour
1 tsp salt and 1 tsp ground pepper

This recipe can easily be doubled to use a whole pork tenderloin for 4 people, or two extra hungry peeps.

Slice the pork tenderloin into ½ inch slices on a diagonal. Pound thin between plastic wrap with a meat mallet or other suitable device. In our case, a large iron skillet worked great.

In a shallow dish, mix the flour, salt and pepper.

In a large skillet, heat 1 Tbsp butter. Coat the pork pieces in the flour mixture and then place in the bubbly butter. Cook for 1-2 minutes per side and then transfer to a warm plate. If needed, do this in two batches, depending on the size of the skillet.

Heat an additional tablespoon of butter in the same skillet. Add the chopped shallot and sautee for 2-3 minutes. Add the capers and white wine. Allow to reduce just a little before adding the final tablespoon of butter. Mix slowly to incorporate and remove immediately from the heat.

Spoon the sauce over the pork medallions and serve. I served this with two "white" sides. I know, food plating "no no" but we are still getting back in the groove since our return from Mexico, so I used what I had on hand. This included some smashed potatoes and some leftover cauliflower mash that my mom gave us. Yummy!!! If I can get her recipe, I'll be sure to post!

Wednesday, November 4, 2009

Pumpkin Spice No Bake Cheesecake


A perfect slice of fall, I'd like to call it. I'm back from Mexico and back to blogging. This recipe from Gina's Weight Watchers Recipe is so delicious. None of your friends or family will know this is a healthier version of the real thing. Go make this NOW!

8 oz 1/3 less fat Philadelphia Cream Cheese
1/2 cup pureed pumpkin (canned is fine)
1 tsp vanilla
1 tsp cinnamon
1 tsp pumpkin pie spice (I substituted 1/2 tsp nutmeg and 1/2 tsp allspice)
1/4 cup brown sugar, unpacked
8 oz Cool Whip Free, thawed
9 inch reduced fat Graham Cracker Crust

In a large bowl using an electric mixer, whip cream cheese, pumpkin, vanilla, cinnamon, pumpkin pie spice, and brown sugar for a few minutes until fluffy. Add Cool Whip and whip until smooth. Spoon mixture into pie crust and chill for a few hours, until firm.

WW Points per Serving (serves 8): 5 points