Roasted Vegetable Ratatouille Pasta Salad
6 days ago


 I've heard a lot about this restaurant from Matt and his friends, specifically those of the hippie variety. So when John and Kristen came into town from Denver for a wedding and stayed at our house, they were excited to go to Golden Harvest.
 This is the view from our table in the corner. There is a wraparound counter to the left, which looks directly at the grill. Straight ahead (by the TV) is the other corner of Golden Harvest, where the cash register is. I'd guess that the capacity of this place is no more than 35-40 people. As soon as one table got up, one of the few overworked, underpaid staff rushed over to wipe the table down.
 I followed the hippie's recommendation (thanks, John!) and got the mild breakfast burrito. I was tempted to get the tomato, basil, mozzarella omelette, but went with the professional's opinion.
 Taken from the Golden Harvest MySpace page, this breakfast burrito contains "Homemade Sausage, Grilled Onions & Peppers, Pepperjack Cheese, scrambled together and wrapped in a fresh Flour Tortilla. Served with sour cream and our Award Winning Homemade Salsa." This tasted fantastic, but there was no way I could finish it.
 Bahahahahahah!!!!!
Update: Layla over at the Lettered Cottage is hosting a Room Re-Do 2009 party. I'm joining in on the fun!
Drumroll please... And now, my loyal readers, I bring you... the bathroom...
BEFORE
Gold fixtures, linoleum and tub with glass sliding door...
 There was a tub here with glass sliding doors, but we were so excited to get rid of it, that we forgot to take a picture while it was still in there.
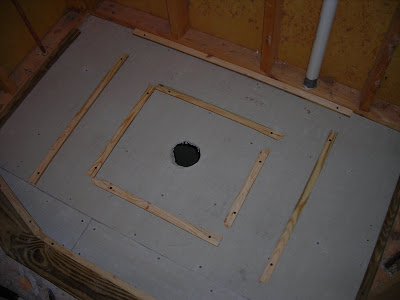
 DURING
Laying the Hardi-backer board.


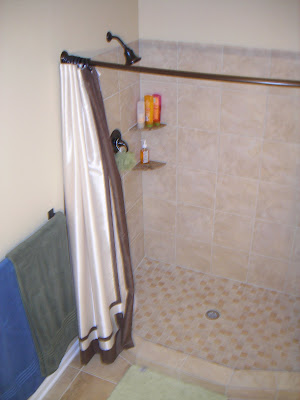
 We also had to do some drywall touch up from building the shower and we painted.




 This is long overdue, but remember when I posted about the giveaway that The Life and Times of Michelle was hosting? Well, wouldn't you know? I won her giveaway! She did the giveaway in honor of her 100th post, which I am approaching, so I am busy thinking up a good giveaway for my faithful readers. Here's some additional pictures of the awesome handmade cards I received in the mail. A big thanks to MrsBreaux (aka Michelle) for sending these cards. I LOVE THEM!!!


 So... our favorite restaurant, Dusty's Cellar, serves some of their entrees with "Creamy Truffle Infused Grits" which are like crack. I can't get enough of them. O.M.G. So frickin' good. So last time we were up in Traverse City, we stopped at one of our favorite spots, Fustini's, and picked up a small bottle of White Truffle Oil. At $10 for 1.7 ounces, this stuff ain't cheap.
 My mom sent me this recipe from allrecipes.com and tonight is actually the second time I've made them. I just haven't had the time to post the recipe on my blog. But I am really going to make an earnest attempt to blog more often than in the recent months. So, we had these for dinner tonight with our good friends, Josh and Katie. The secret is in the three methods of cooking the ribs. These ribs fall right off the bone and are so incredibly moist.


