Tuesday, July 28, 2009

Beef Stroganoff


Ahhh, yes. A classic Hamburger Helper packaged dinner, made with ground beef and a powdered sauce..... BLECH!! I never liked Hamburger Helper as a kid and I certainly don't like it now.

From beefstroganoff.net:

"Beef Stroganoff is a classic Russian dish that has proved its delicious worth time and time again. The dish consisting of strips of lean beef sautéed and served in a sour-cream sauce with onions and mushrooms. Count Pavel Stroganov, a noted 19th century gourmet as well as a friend of Alexander III and a celebrity in turn-of-the-century St. Petersburg, is often credited with creating Beef Stroganoff or having a chef who did so."

The recipe I used was found on the beefstroganoff.net homepage. There are many variations of this recipe floating around, but the basic concept is the same. I lightened mine up a bit from the original recipe, using less butter and lite sour cream. I also didn't have any nutmeg or tarragon on hand *gasp* so I omitted them. I'd love to make this again with these ingredients included. My modified recipe follows.

1/2 lb top sirloin steak, sliced into very thin pieces
1/2 sweet onion, roughly chopped
4 oz (half a container) mushrooms, roughly chopped
1 1/2 Tbsp butter
Salt and Pepper: to taste
2/3 C lite sour cream
1/8 teaspoon nutmeg - optional
1/2 teaspoon dried or fresh tarragon - optional
Egg noodles

Melt 1 Tbsp butter in a large skillet over medium heat and adjust the heat to add the thin beef strips cooked till brown. Add salt and pepper to taste while cooking. Remove from heat and set aside in a bowl.

Start a pot of salted water to boil. Add in and cook some egg noodles as directed on the package.

In the same pan, add the remaining 1/2 Tbsp butter. Add the onions and mushrooms and sautee until soft, 5 to 7 minutes.

Lowe the heat to a simmer. Add the meat back into and then add the sour cream. Make sure the sour cream mixes with the meat and vegetables without simmering, as it will cause the sour cream to curdle.

WW Points per Serving (serves 2): 14 Points.. YIPES! I didn't realize it was this high!


Monday, July 27, 2009

Before and After: The Bathroom

Update: Layla over at the Lettered Cottage is hosting a Room Re-Do 2009 party. I'm joining in on the fun!

Drumroll please... And now, my loyal readers, I bring you... the bathroom...

BEFORE
Gold fixtures, linoleum and tub with glass sliding door...

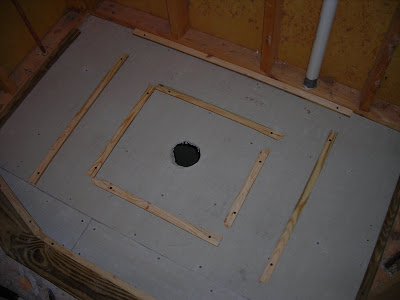
There was a tub here with glass sliding doors, but we were so excited to get rid of it, that we forgot to take a picture while it was still in there.
DURING

Laying the Hardi-backer board.


Putting in guides to ensure a 1/4 inch per foot slope.

Layer of mortar.

Super-thick liner.

Cut the hole for the drain and put Hardi-backer board on the step.

Floor laid! These are 12" mosaic tiles, made of 2x2" tiles.

Wall tiles laid! Forgot to take a picture of the backer board. Don't worry. It's boring to look at. The shelves are granite, ordered from ebay.

Heated floor, baby!
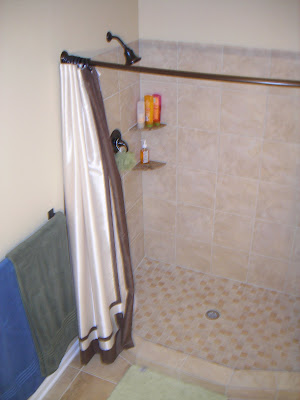
We also had to do some drywall touch up from building the shower and we painted.

AFTER
Oil Rubbed bronze fixtures, heated tile floor and dual shower headed shower...


So there you have it! The total project took about seven weeks. We estimate our total cost at around $,1500. We estimate that it would have cost around $10,000 to have this professionally done. Because Mr. Tote is THE SH*T, we did all of the work ourselves. We hired a buddy of his to run the plumbing for the second shower head, but that was the only work we outsourced. I take complete credit for picking out the tile, shelves, fixtures, paint color and towel colors. That's about all I did, besides putting the spacers in between the tiles for him and helping seal the grout. Pretty much, my husband is A.MAZ.ING and we absolutely love our new shower.


Sunday, July 26, 2009

Winner!

This is long overdue, but remember when I posted about the giveaway that The Life and Times of Michelle was hosting? Well, wouldn't you know? I won her giveaway! She did the giveaway in honor of her 100th post, which I am approaching, so I am busy thinking up a good giveaway for my faithful readers. Here's some additional pictures of the awesome handmade cards I received in the mail. A big thanks to MrsBreaux (aka Michelle) for sending these cards. I LOVE THEM!!!


Creamy Brie and Truffle Grits

So... our favorite restaurant, Dusty's Cellar, serves some of their entrees with "Creamy Truffle Infused Grits" which are like crack. I can't get enough of them. O.M.G. So frickin' good. So last time we were up in Traverse City, we stopped at one of our favorite spots, Fustini's, and picked up a small bottle of White Truffle Oil. At $10 for 1.7 ounces, this stuff ain't cheap.

Tonight, I attempted to replicate Dusty's Creamy Truffle Infused Grits to go with The Most Amazing Ribs. I added in some Brie cheese because, well, I can't seem to make anything without cheese in it.

I took my first bite and couldn't believe it. They tasted almost exactly like the grits at Dusty's! I still have this ridiculous shit grin on my face because I am so surprised that these turned out so similar to the Dusty's fare that I crave so often. I can't WAIT to make these again!

4 C chicken stock
1 C quick grits
1 Tbsp butter
3 oz brie cheese, rind removed, shredded
2 tsp truffle oil

Bring the chicken stock to a boil and add the grits. Cover and reduce to a simmer, stirring occasionally for 5 to 7 minutes.

When liquid is mostly absorbed, add in the butter. Stir to incorporate. Then add the cheese and stir to incorporate. Right before serving, add in the truffle oil and stir to incorporate. Serve hot! Be sure not to drool on your plate while saying your dinner prayer :-)


The Most Amazing Ribs

My mom sent me this recipe from allrecipes.com and tonight is actually the second time I've made them. I just haven't had the time to post the recipe on my blog. But I am really going to make an earnest attempt to blog more often than in the recent months. So, we had these for dinner tonight with our good friends, Josh and Katie. The secret is in the three methods of cooking the ribs. These ribs fall right off the bone and are so incredibly moist.

3 pounds pork baby back ribs
1 pinch black pepper
1 pinch salt
1 pinch crushed red pepper
2 cups barbecue sauce
2 (12 ounce) bottles porter beer, room temperature

Trim the ribs of excess fat, as needed. Cut ribs into small portions of 2 or 3 bones each. Bring a large pot of water to a boil. Season water a pinch each of salt, black pepper, and crushed red pepper to the water. Boil ribs in seasoned water for 20 minutes.

Drain, and let the ribs sit for about a half an hour. Meanwhile, preheat an outdoor grill for high heat.

Lightly coat the ribs with barbecue sauce. Cook the ribs over high heat for a 5 to 10 minutes on each side to get a nice grilled look to them.

Place grilled ribs in a slow cooker. Pour remaining barbecue sauce and one bottle of beer over the ribs; this should cover at least half of the ribs.

Cover, and cook on high for 3 hours. Check ribs every hour or so, and add more beer if needed to dilute sauce. Stir to get the ribs on top into the sauce. The ribs are done when the meat is falling off the bone. The ribs were cooked completely in the first process, the rest is about flavor and texture.


Wednesday, July 22, 2009

Product Review: Arnold's Select Sandwich Thins


So I decided that I should highlight products that I like on my blog. I am always trying new foods and I am entitled to my opinion, so why not share it with my lovely readers? Who knows... maybe you will appreciate my honest opinions, maybe not. I am going to get very "jump on the bed" excited to hear what you think of these products, so do share!

I heard about these puppies from my Bama (my grandmother), who is a Weight Watcher's lifer. I was a bit skeptical, because I am not a fan at all of Flatout Bread, despite the hype. I find them incredibly chewy, with a funny aftertaste.
So I purchased some of Arnold's Select Sandwich Thins Whole Grain White variety the last time I was in Wal-Mart (*shudder*).

GET THEE TO A STORE AND BUY ASAP! These morsels are soft, non-chewy goodness in a 1 point perfect circle! I made a sandwich today with some shaved turkey breast, Sargento Reduced Fat Pepperjack Cheese (spotted on shelves this week by Hungry Girl), lettuce, dijon mustard and lite Miracle Whip. Yummy!

I am thinking these could be used for hamburger buns and even hot dog buns, as a substitute for a bagel or english muffin im a breakfast sandwich, mini-pizzas... the list seems endless.
Verdict: RAVE!


Friday, July 10, 2009

Creamy Chicken with Cilantro

This recipe was inspired by Mary Ellen's Creamy Dill Chicken. I pretty much took all the ingredients she used and modified them to what was in my pantry. Instead of lemon juice, I used lime. Instead of peas, I used corn. Instead of dill, I used cilantro. Etc, etc.

Matt absolutely loved this dish and told me to add it to our normal rotation, whatever that means :-)

Juice of 1 lime
1/3 cup half and half
1/2 teaspoon kosher salt, divided
1/2 cup all-purpose flour
1 tablespoon butter
1 large boneless, skinless chicken breast, trimmed
1/4 teaspoon black pepper
1 teaspoon olive oil
1 cup reduced-sodium chicken broth, divided, plus more as needed
1/2 cup frozen corn, thawed
3 tablespoons finely minced fresh cilantro, plus sprigs for garnish
1 tablespoon corn starch

Combine lime juice and cream in a small bowl. Season with 1/4 teaspoon salt. Don't be afraid if it starts to separate. I was worried, but it turned out just fine.

Dry chicken thoroughly with paper towels.

Dredge lightly in the 1/2 cup flour, seasoned with pepper and salt, shaking off any excess.

Heat 1 tablespoon butter and oil in a large skillet over medium-high heat. Add the chicken. Cook, turning once, until nicely browned on both sides, about 10 minutes total.

Add 1/2 cup broth, reduce the heat and cover. Simmer until the chicken is cooked through, 4 to 6 minutes. (Check to make sure the pan juices don’t run dry. If necessary, add more broth, a tablespoonful at a time, to prevent scorching.) Transfer the chicken to a clean cutting board and tent with foil.

Add the remaining 1/2 cup broth to the pan and bring to a boil over high heat. Cook until reduced to about 1/4 cup, 2 to 4 minutes.

Reduce heat to medium, add the reserved lime cream and bring to a simmer.

Mix the corn starch with 2 Tbsp COLD water. Gradually whisk in the corstarch mix, until the sauce coats the spoon, 1 to 2 minutes.

Stir in thawed corn.

Reduce the heat to low and return the chicken to the pan along with the cilantro. Turn to coat with the sauce and cook until heated through, 1 to 2 minutes. Slice the chicken and serve with the sauce, garnished with sprigs of cilantro, if desired.

Like Mary Ellen, I served this over egg noodles. It was excellent!


Wednesday, July 1, 2009

Fuddy Duddies

Confession: I can't help taking pictures of our pets. Athena, Ozzy and Pandora are such a joy and I can't help but smile when they do something cute or funny. Here are some of my recent faves...

Ozzy's first boating trip...

Me, the Oz-meister and my kick ass bass!

Let me explain...

Little Miss Pandora loves to be outside. Great! We love to let her out so she can soak up the rays. Well, one day I was exploring the pond and wooded area behind our house looking for a mysterious meowing kitten (which I never found, by the way). When I came back up to the house, Matt informed me that he couldn't find Pandora. Secretly, I was thinking that he "conveniently" left the gate open since he isn't exactly in love with her. Well, I freaked out and started searching all over for her. FOUND! She had made her way under our shed and was just hanging out under there, with no intentions of coming out.

So Matt and I grabbed rakes and started sweeping our weapons under the shed to force her out. She hipped and hopped over the handles, like it was a game. So I had the brilliant idea to grab the hose and soak her out. So, here I was, sweeping my rake while Matt's on the other side, spraying her and laughing hysterically. Well, she FINALLY came out...and she was furious.

And now onto adorable Athena Grace, the cat who loves to sleep on our BRAND.NEW. couches... sometimes in a sitting position.

Post-visit to the groomer who shaved her. SILLY!

All sprawled out...

Maximum face smooshage...

Enjoy! I'm sure I'll post more soon!


Blueberry Crumb Cake

I had to post this recipe because it is one of my few baking successes in the recent past and I've been seriously doubting my baking "ability" I think I should just stick to cooking. I made some jam bars earlier this week, followed the directions to a tee and the bars turned out super dry and a little crunchy... yuck!

BUT! Chalk another one up for Shelby over at The Life and Loves of Grumpy's Honeybunch. She manages to always find the best Cooking Light recipes!! This blueberry crumb cake was SO moist and SO flavorful. I doubled the amount of crumb topping, because I'm a crumby kind of girl (teehee!!). It probably didn't need that much, but it was still delicious! I took this up to Traverse City for the Leland Wine and Food Festival and four of us devoured it for breakfast the morning of the event. I will def be making this one again!

Cooking Spray
2/3 cup sugar
1/4 cup stick butter, softened
1 teaspoon vanilla extract
1 large egg
1 1/3 cups all-purpose flour
1 teaspoon baking powder
1/4 teaspoon baking soda
1/8 teaspoon salt
3/4 cup lowfat buttermilk (see note below)
1 cup blueberries

Crumb Topping
(these are the original measurements)
3 tablespoons sugar
3 tablespoons flour
1 tablespoon butter, melted
1 teaspoon ground cinnamon

Note: I was worried about having to buy buttermilk and then not using it for much else, so I looked up what to substitute for buttermilk and I learned how to make my own! Me = SUPER EXCITED! Now, I can finally make buttermilk pancakes! The simple way is to take 1 tablespoon of white vinegar in a large measuring cup and then fill with milk to the one cup line. Use only as much as your recipe calls for.

Aaaannndd BREAK! OK, back to the recipe...

Preheat oven to 350 degrees.

Coat a 9-inch round cake pan with cooking spray. I used a 9 inch square glass baking dish, which worked equally as well.

Line the bottom with wax paper, and coat the wax paper with cooking spray. (I skipped this)

Beat 2/3 cup sugar and 1/4 cup butter at medium speed of a mixer until blended (about 5 minutes). Add vanilla and egg; beat well. Lightly spoon 1 1/3 cups flour into dry measuring cups; level with a knife. Combine flour, baking powder, baking soda, and salt. Add flour mixture to creamed mixture alternately with buttermilk, beginning and ending with flour mixture. Stir in blueberries.

Pour into prepared pan. Combine 3 tablespoons sugar and remaining ingredients in a bowl; stir until mixture resembles coarse meal. Sprinkle sugar mixture over batter.

Bake at 350 degrees for 40 minutes or until a wooden pick inserted in center comes out clean. Cool on a wire rack.

WW Points per Serving (1/8 of recipe): 6 points